Author Topic: Project RM175F  (Read 41023 times)

0 Members and 1 Guest are viewing this topic.

monaro308

  • Guest
Project RM175F
« on: February 08, 2010, 01:12:29 am »
Made a start on my next project during the week...PE175 engine out of my "on the back burner" 83' PE175D....i think it is actually an "E" engine going by the numbers i have and the 85' RM125F bitsa with a destroyed engine. 80% of the bike is there.....so i thought why not!
Now that i'm on arvoshift,a man needs a project to keep himself occupied  ;D
Rear shock was blown on both bikes,so that was a bad start :'( and it is an RM250 shock after sorting out parts for it.

The RM engine being w/cooled (no fins)and centre exhaust port against the PE,big finned air cooled and angled port....the frame is gonna be getting a good workover.
First thing was the engine wouldn't fit in the frame because of the big finned head and barrel (good start)  ::) so off with the top end and sit the engine in with the PE rear engine mount bracket.
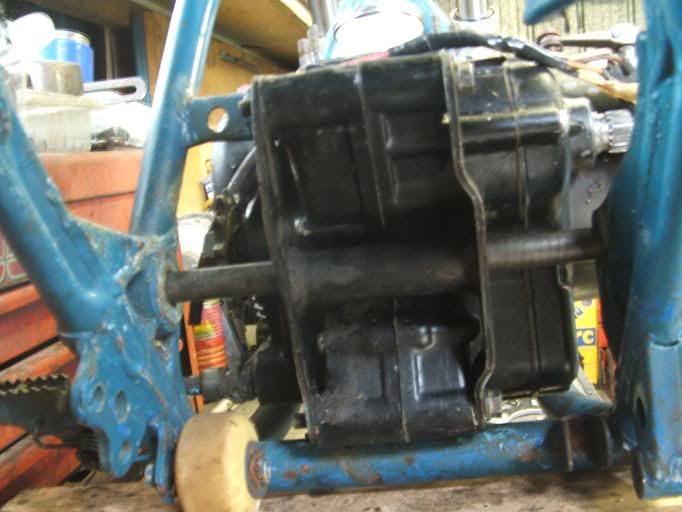

All good and even the bottom case mount lines up with RM frame mount.
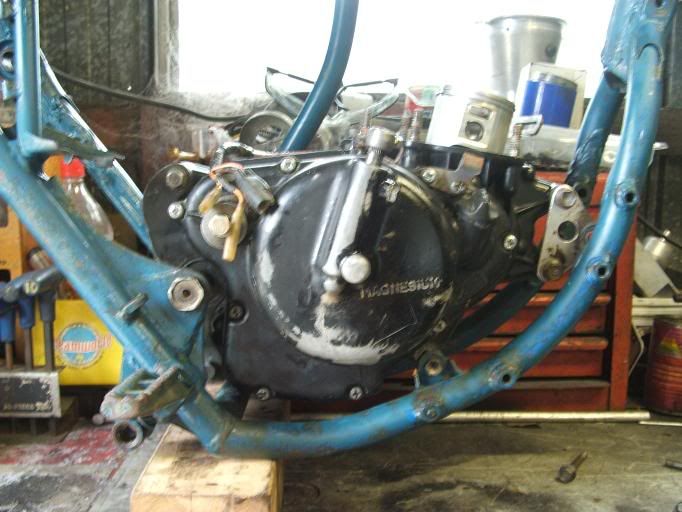

Front case mounts to frame will need to be made up.
Fitted the swingarm into the frame and that bolted straight in with the PE bracket! Too easy  ;D
Wrong!! Then i noticed the engine sprocket being further outboard.
I measured up the PE cases against the RM cases...hmm PE engine is wider by about 10mm.
Fitted the rear wheel and "lasered" up the rear sprocket to the front sprocket...yep she's out alright!
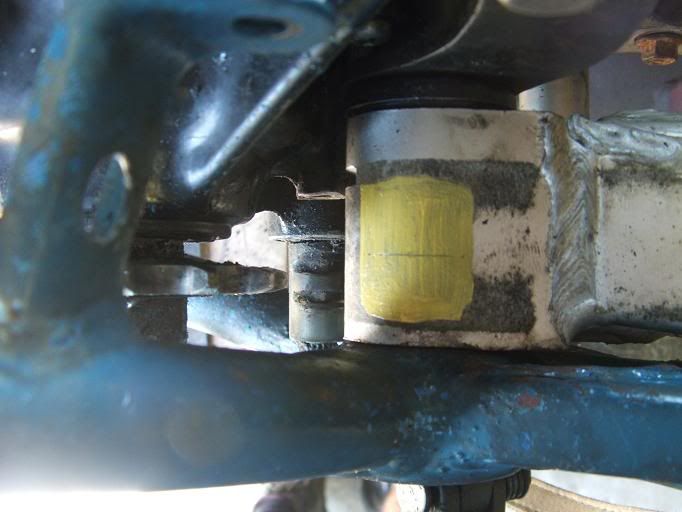

So out came the PE bracket and i've been making another bracket to move the engine over to the right side and rebuilding the rear shocker over the weekend.


More to come......

Offline Mick D

  • Legend
  • *****
  • Posts: 2915
    • View Profile
Re: Project RM175F
« Reply #1 on: February 08, 2010, 01:30:01 am »
Hi monaro 308, I have had "three" pe175's during my life! they were mainly used for work hacks, at the time. Their trail ability really suprized me when I had the odd chance I to venture off road. I rebuilt the trunion suspension set up on one of the single shock set up's once!!!!!!! nearly had to sell the first born!!!!!!!!!$$$$$
« Last Edit: February 08, 2010, 06:16:50 am by MICK-DE »
"light weight, and it works great"  :)

monaro308

  • Guest
Re: Project RM175F
« Reply #2 on: February 08, 2010, 10:31:28 am »
Hi Mick...yeah the PE served me well in the 80's (PE175X)for 9 years and a workmate had the D model floater he was going to offload so i said yes knowing the floater linkages are a VERY costly exercise.
The whole bike has been abused BADLY and i mean bad!
It will get done oneday in dribs and drabs....no hurry.

The RM bitsa cost me $200 even with a brand new Dunlop756 on the rear.....and then the mind had visions...hmm PE175 engine and lighting capability,bitsa RM125 bike with yummy 43mm forks and front disc and i need another project on arvoshift  ;D
The front downtube side of things it going to be the tricky part clearing the barrel and head and angled ex-port,although being semi-cradled the right downtube may remain if i can make the left side look nice with maybe a loop for the pipe to enter the ex-port....we'll see..early days yet!
More to come!

monaro308

  • Guest
Re: Project RM175F
« Reply #3 on: February 09, 2010, 02:19:54 pm »
This is the tight squeeze of the PE engine into the 125 frame.
The diagonal frame tube is going to come out,but i will work out how much and if i can save the airbox bracket part of the tube i will.


Rear mount brackets made up


I had to double plate the bracket and step it in to move the engine to the right to line up the front sprocket to the rear.

I will weld the support in the centre once everything is correct.


DR

  • Guest
Re: Project RM175F
« Reply #4 on: February 09, 2010, 02:33:04 pm »
this is all food for thought Mario, keep it coming 8) Ironically it would seem I'm about to become the owner of an '84 RM125E for much the same coin as yours. The top end is missing but apparently the rest is all there. Depending on what the engine and the rest of the bike is like it could end up a project also if it's all too far gone ;) 

Offline BAHNZY

  • Legend
  • *****
  • Posts: 1149
    • View Profile
Re: Project RM175F
« Reply #5 on: February 09, 2010, 04:07:04 pm »
Or could just build this;
 ;)

Rod (BAHNZY) Bahn

monaro308

  • Guest
Re: Project RM175F
« Reply #6 on: February 10, 2010, 01:53:18 am »
Bahnsy is that a PE engine or a modded PE top end on a RM bottom....if that can be done cause i think the stud spacing is wider on the PE's....not sure on that one.
Hows it go and are you happy with it?

Thats great Doc....i think they are pretty much the same bike.
85 had the disc front and 84 has the twin leading shoes.
I'll keep posting pics....as i'm a stubborn prick and once i get something in my head i'll keep at it.
If it turns out well,the added bonus of getting a lighting kit on it to get rec reg may make it a keeper and possibly say goodbye to the 06 WR450F....its a great bike but its a $6000 bike that doesn't get used alot.
Post your pics in here when you get it.
Cheers....i better get to bed!

Offline Marc.com

  • Legend
  • *****
  • Posts: 3887
    • View Profile
Re: Project RM175F
« Reply #7 on: February 10, 2010, 07:44:25 am »
semi-cradled the right downtube may remain if i can make the left side look nice with maybe a loop for the pipe to enter the ex-port....we'll see..early days yet!
More to come!

Nice job so far, you are almost there, remember it only has to miss everything by a couple of mm or two.

Keeping the airbox downtube is well worth it, you end up with a mini RN500.
formerly Marc.com

TT

  • Guest
Re: Project RM175F
« Reply #8 on: February 10, 2010, 10:05:28 am »
Yeah, well done. I love this sort of stuff.
The only special I ever built was an XT200 engine in a PE chassis.  ::)
Don't ask why, as I'm still asking myself the same question.
I guess because it was another bike to ride that cost virtually nothing.   ;D

monaro308

  • Guest
Re: Project RM175F
« Reply #9 on: February 10, 2010, 01:05:52 pm »
Tony....that is the key "I guess because it was another bike to ride that cost virtually nothing" well i hope it turns out that way....lol

Marc i want to try and keep the airbox tube there even to the point of cutting about an inch at the top and bottom and slightly turn the tube and reweld to clear the head as its even bigger with the finning.
I'll make up the front mount plates next and spacers for the bottom mounts between the case and frame tabs.
I'm debating on using alloy plates or steel plates....i suppose alloy because of vibration,but as usual,when i need my TIG (just a cheapy china brand but works well for what i need)i run out of Argon!
I started to tig the rear mounts and just run out of gas,so out came the 30y/old WIA arc...lol
Nothing a can of black and silastic beading to give it that "A" grade tig look  ;D can fix.
cheers

Offline Marc.com

  • Legend
  • *****
  • Posts: 3887
    • View Profile
Re: Project RM175F
« Reply #10 on: February 10, 2010, 02:56:46 pm »
can you cut and knock the frame tube a bit at the top and still get the airbox in.

Don't worry about your welding you can't do any worse than Suzuki, drunk with the cheapest Chinese welder.

What are you using for a gas tank ?? ;D

formerly Marc.com

Offline BAHNZY

  • Legend
  • *****
  • Posts: 1149
    • View Profile
Re: Project RM175F
« Reply #11 on: February 10, 2010, 03:27:45 pm »
The bike is/was a 1983 PE175.
Whilst I considered the route of using the 84 Chassis (I’ve got a few of them) i didn’t see that the work to get the engine into the frame and the associated work was worth my time. So what was built is;
- A stock 83 PE175 frame and swing arm with the loop removed from behind the seat.
- Fitted a 84 RM125 shock (less the remote reservoir)
- The frame was then modified to accept the complete plastic kit from a RM465
- A RM125N fuel tank was fitted.
- Top-Line Motorcycle Upholstery then made a foam to suit the seat tank junction and covered the seat.
- The engine is a ported RM175 engine with Boysen Reeds and a 1.0mm o/s Wiseco.
- Expansion chamber was sectioned and the baffles, etc removed. Pro Circuit supplied the rear muffler.
- Gearbox is from a RM125C
- Front suspension is standard 83 PE but will be swapped out for a 43mm RM125 unit when I get a chance.

Bike is set up for my daughter at 70kg and does the job real well. When i get on it the poor thing struggles, i'll stick to my PE250T.
« Last Edit: February 10, 2010, 04:18:12 pm by Bahnsy »
Rod (BAHNZY) Bahn

Offline ty4

  • A-Grade
  • ****
  • Posts: 385
    • View Profile
Re: Project RM175F
« Reply #12 on: February 10, 2010, 05:38:21 pm »
have some engine plates that may save you some work, alloy or steel
live in the same area as you ,let me know
cheers
tony

Offline holeshot buddy

  • Legend
  • *****
  • Posts: 2008
  • sunshine coast qld
    • View Profile
Re: Project RM175F
« Reply #13 on: February 10, 2010, 09:37:23 pm »
marc i think you better give me that tank for my bike ;D
it will look better on my bike :D
you dont need it ;)


it will fit if i can fit a 500 engine in same frame it will fit ;)
follow me to first turn

monaro308

  • Guest
Re: Project RM175F
« Reply #14 on: February 11, 2010, 02:14:45 am »
Bahnsy i have what you made  :)
This is the PE thats on the backburner until a later date.
Every single part needs doing.


Ty4 thanks for the offer as i have B,T,X and the F front mount plates and they all don't match the engine to frame and i'm sure i will have to make new plates for it.......but i'll keep you in mind for sure.

Marc i can pretty much remove most of that tube.The bottom mount is at the front sprocket in the picture and the other 2 are top and the back.The airbox is a side mount access type.
I will try and mount the airbox tomorrow to see how far the boot and the angle of the boot is to where the carby will be....but that tube needs to go before i can sit the cylinder on the cases.
I may be able to notch out the back of that front downtube right where the top of the cylinder is in the pic and then the battle with the head begins.
Tanks i have to try are PE175D,the RM125F with the scoops because it was w/cooled,a RM125N,T tank,RM125C tank.
They all seem to fit pretty well if i make new mounts for them,then because of the RM safety seat it looks a little odd.
I thought about using the original F tank and then making 2 fake looking radiators as extra fuel tanks...just a thought at the moment.
Thats it for another day/night...thanks everyone  ;)
Bedtime