Author Topic: My vintage supermoto  (Read 24008 times)

0 Members and 1 Guest are viewing this topic.

Offline mudguard

  • B-Grade
  • ***
  • Posts: 220
    • View Profile
Re: My vintage supermoto
« Reply #30 on: October 09, 2010, 09:37:19 pm »
If this aint Ji, alias "Christo" it must be his brother??? Just a newbie to ozvmx, and so much detail in posting photos. Where has Ji been for so long??? Who elso would would have so much passion & technical know how for a new project? Why is that bike under a blue tarp, could it be one of Ji's YZ's under that?? ;D ;D ;D
I thought I was wrong once, but I was mistaken.

Offline Christo

  • C-Grade
  • **
  • Posts: 79
    • View Profile
Re: My vintage supermoto
« Reply #31 on: October 10, 2010, 01:17:58 am »
Thanks for all your feedback gents. But I do want this to have a vintage look so I want to keep away from plastics. Actually I love the idea of a cafe style seat hump, will be sure to investigate.

Offline Christo

  • C-Grade
  • **
  • Posts: 79
    • View Profile
Motorcycle seat repair $5 plus glue
« Reply #32 on: November 16, 2010, 10:28:07 pm »
I finally got round to repairing my seat which I had cut and shut to improve the lines. I took about 25mm off the top and about 75mm off the length. This allowed me to retain the old seat cover, I simply cut the damaged corner off and replaced it with my $5 seat cover which came from a Honda XR250RG. It looks very used, but that was what I wanted and cheap too. Just stuck it all back together with contact adhesive. I was thinking about sticking something else over the join for aesthetics and for additional reinforcement. Maybe a natural brown leather belt?


Offline Christo

  • C-Grade
  • **
  • Posts: 79
    • View Profile
Re: My vintage supermoto
« Reply #33 on: January 08, 2011, 01:35:03 am »

Here are all the major engine components laid out on my new work bench, in my new workshop which is the size of a large broom cupboard. This is exactly how I got the engine. Two pistons one standard size in good nick, one piston 050 oversize with some scoring on the exhaust side. Two cylinders, one that has been rebored to about 87mm (standard bore is 85mm) and one rusty one which is ??mm. Two cylinder heads, one with a broken inlet valve (you can see where the valve marked the combustion chamber) and the other with a slightly bent inlet valve. So I suppose you could assume that the engine was disassembled because either a cam chain snapped or the engine was assembled previously with incorrect cam timing and caused the piston to bend the inlet valve. There appears to be no damage in the crankcases where the cam chain runs so I think the cause was the latter. Either way I will still be investing in a new cam chain.


Offline Christo

  • C-Grade
  • **
  • Posts: 79
    • View Profile
Re: My vintage supermoto
« Reply #34 on: January 25, 2011, 03:07:10 pm »
I fully built the 5" wide rear wheel with the standard DR hub to satisfy myself (and others) that the hub and rim were compatible. That is all the angles of the spokes are right when laced together. The final build will probably use 5mm spokes rather than 4mm spokes.
I have been quoted $200 to supply the spokes in 5mm stainless steel, as the spokes that came with the wheel are not compatible. I have also been playing with the hub offset to ensure that tyre and chain clearances etc are OK.
Note also the rear tailight assembly with 'beehive' tailight. I am definitely going to swap the plastic indicators for chrome items with round lenses.


Offline Christo

  • C-Grade
  • **
  • Posts: 79
    • View Profile
Rear Wheel Mock-up Part III
« Reply #35 on: January 31, 2011, 11:40:18 pm »
The brake torque must be cut and shut to clear the 5” wide rim & 150 wide rear tyre.
I simply used an angle grinder to cut slots where I wanted the bend to occur. Once I am happy with the fit I will get it welded properly.
The other photo shows the difference in the brake-torque-arms, the one on the left is the standard one.


Offline Christo

  • C-Grade
  • **
  • Posts: 79
    • View Profile
Front end
« Reply #36 on: February 15, 2011, 01:18:31 pm »
Finished assembling the 17 x 3.5 inch supermoto rim to the DR drum hub yesterday. The spokes will need to be shortened and re-threaded to suit the DR hub. I fitted the wheel with a 110/60 tyre which goes between the fork legs with about 5mm clearance either side. Will be interesting to see if a 120/60 will fit as recommended for this rim, but I do not think going down a size will matter. I will have to grind off the cable guide mounts on both sides to ensure clearance. Very happy with the result.


Offline Christo

  • C-Grade
  • **
  • Posts: 79
    • View Profile
Going backwards still…
« Reply #37 on: March 10, 2011, 12:19:02 am »

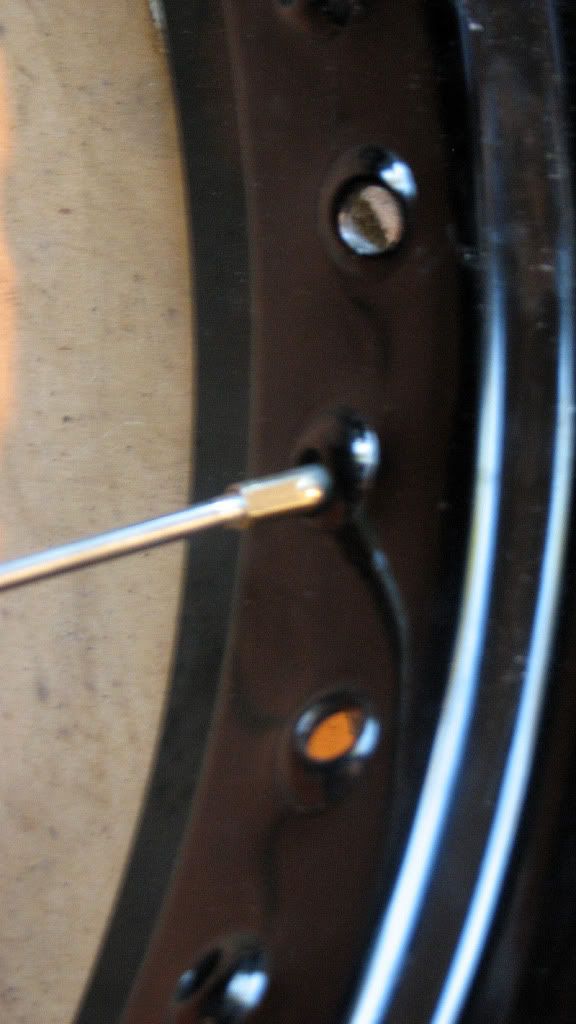
Unfortunately  all my efforts to try and mate 17 inch supermoto rims to old school drum hubs have been in vane. It is a bit hard to tell from the photo, but the angle of the spoke holes in the rim is not quite right and so the spoke does not seat properly in the rim. The joys of customising, its taken about a year to get to this point, only to start over again.
The next plan of attack is to go for 18 inch rims front and rear. If I can source a rim that is drilled for an old style hub, say from an old open-class Suzuki motocross bike them it may fit. I could get 17 or 18 inch rims custom drilled with custom spokes, but that is probably about a $1200 option. I still reckon its possible to do it for around $500.
Back to the old drawing board, stay tuned folks, its going to get even more interesting.


Offline Christo

  • C-Grade
  • **
  • Posts: 79
    • View Profile
Rear wheel becomes the front
« Reply #38 on: April 05, 2011, 01:00:43 am »
When comparing the front and rear hubs I noticed that they looked fairly similar. They both use 150 x 28 brake shoes, but the rear hub has larger bearings and is about 20mm wider, so you cannot lace the rear rim to the front hub (spoke angles are different). The front brake plate slots perfectly into the rear hub. So it looks fairly likely that I can run the rear hub and rim on the front! I will to see if I can get bearings that fit the OD of the hub and the ID of the smaller axle. According to wemoto.com the front bearings are 12x32x10 and the rear left is 17x40x12 and right rear is 17x47x14. So that means I need 12x40x12 and a 12x47x14. Will do a mock up of the whole setup sometime this week. I'm not concerned about the lack of a speedo drive as I will be using an electronic unit anyway.

The DR400 rear rim is 18x2.15 which will allow me to run up to a 110/90 front tyre according to the 2011 Michelin tyre fitment guide: http://www.michelinmotorcycle.com/pubs/fitment2011.pdf

The rim is a little beaten up and has one small flat spot, which will come out with a little heat and a shaped male and female dolly. I also bought a JOSCO metal polishing kit just to see if I really make that rim shine. I also have brand new zinc plated spokes that I got for nothing which I will also use.


Offline Christo

  • C-Grade
  • **
  • Posts: 79
    • View Profile
Vintage Supermoto Vintage Tyres
« Reply #39 on: June 02, 2011, 08:47:10 pm »
If there was such a thing as a vintage supermoto, then this is a bit what it would look like. 18 inch Akront style rims front and back, shod with vintage Firestone tyres. They look great, but unfortunately their performance is also post-war. And then its just a logical step to White Walls....


Offline Graeme M

  • Administrator
  • Legend
  • *****
  • Posts: 3066
  • Canberra, Australia
    • View Profile
Re: My vintage supermoto
« Reply #40 on: June 02, 2011, 09:53:32 pm »
How about the real thing? A 1985 XR600...


Offline LWC82PE

  • Superstar
  • ******
  • Posts: 6006
    • View Profile
    • PE motorcycles & SuzukiTS.com
Re: My vintage supermoto
« Reply #41 on: June 03, 2011, 01:14:56 am »
These days you can get rims drilled to suit what ever you want and even get rims that arent quite right modified so they are right. A lot of places start with universal rims and then have a special cutter tool that cuts a specific section out at the back of the dimple to correct the spoke angle. It does not take much. Just running a drill bit through on the right angle will not corect the angle. You need to set the angle from the seat of the nipple otherwise when you tighten up the spoke it will naturally go in the angle dictated by where the nipple wants to sit in the dimple.
Wanted - 1978 TS185 frame or frame&motor. Frame # TS1852-24007 up to TS1852-39022

Offline Christo

  • C-Grade
  • **
  • Posts: 79
    • View Profile
Re: My vintage supermoto
« Reply #42 on: June 04, 2011, 07:33:15 pm »
LWC82PE, If i find a suitably sized rim at the right price that is close I might try to see if I can modify the drilling to suit.

Offline Christo

  • C-Grade
  • **
  • Posts: 79
    • View Profile
Re: My vintage supermoto
« Reply #43 on: July 29, 2011, 09:25:57 pm »
Came home last night to find this little parcel. Its a NOS Wiseco 1.5mm oversized piston kit complete with rings, pin and circlips. At about $130 including post from Canada its less than half the price of a genuine Suzuki part. Just need to get the cylinder rebored to suit and will probably take it over to Ray Easson Engineering as they have a great reputation for quality work.


Offline Christo

  • C-Grade
  • **
  • Posts: 79
    • View Profile
FINAL Concept
« Reply #44 on: August 26, 2011, 03:32:36 pm »
Thsi is the FINAL concept! Note the new specs alongside the old specs!